Revision Difference
Citizen_Model#547113
<cat>Dev.Model</cat>
<title>Citizen</title>
The Citizen character is the default player model provided by Facepunch.
# Source files
All source files of the Citizen model come with the game. You can find them right in the game folder, under **"addons/citizen/models/citizen"**. These files are effectively always synced straight with the official sources; when new animation files are added on our end, they'll show up in that folder for you too!
**If you don't have access to the game yet, you can find the FBX file and textures here:** [citizen.fbx](https://files.facepunch.com/maxlebled/1b0811b1/citizen_2022-06-08.fbx) [citizen_textures.zip](https://files.facepunch.com/Taylor/1b2011b1/citizen_textures.zip)
**Updated 2022-06-08** with skinning and triangulation improvements for the [upper arm, shoulders,](https://files.facepunch.com/maxlebled/1b0811b1/citizen_v2_june22update_2.gif) [wrists, elbows, and kneecaps,](https://files.facepunch.com/maxlebled/1b0611b1/citizen_v2_june22update.gif) along with very minor weight edits in other places.)
# Creating a new player model...?
Before you do anything with the sources, ask yourself: do you just want to add a new model on top of the existing animations (like in Gmod), **OR** do you want to add new animations and effectively "fork" the model?
## Fork it...
If you create a new "forked" VMDL, you may have keep up with any changes and updates that we make to citizen.vmdl yourself.
However, this is largely (if not wholly) automated by simply using the *.vmdl_prefab files, and doing your changes right besides them: that is to say, you don't touch the contents of the prefab at all, while your new nodes go under the prefab nodes. These prefab files can be thought of as the Source 2 equivalent of .qci (QC includes) files.
If you don't do anything too off the beaten path, it means you may be prompted to recompile your model every so often when we update the prefab files, but you may not even *need* to actually do it.
The implementation of an animgraph equivalent for something like this is being worked on.
## ... or show a new thing on top
Now, on the other hand, if what you're trying to do is "create a new player model", in the sense of Gmod 13—that is to say, a character model that references an existing animation set—you should **not** "fork" citizen.vmdl! Your gamemode should instead use citizen.vmdl as is, but hide all its meshes, and then bonemerge your custom meshes on top. Think of it like bonemerging a hat in Team Fortress 2, except you're doing that with the entire body.
If you want to create a model that differs radically from the proportions and look of the Citizen, though, it'll be up to you to provide your own skeleton, animations, and animgraph... but at this point, you're creating something entirely new, and that's outside the scope of this page.
## Extending the model as-is with new animations
If you only need to add a few animations to the VMDL, you can try using the "Base Model" feature. This is somewhat similar to the Source 1 "$includemodel" feature. You can only add animations to an existing model using this feature; you can't do anything else. You only need to reference the official citizen.vmdl file in the "Base Model" field, above the "Add" button in ModelDoc.
# Scale
Note that the model is provided in centimeters; we've chosen to let the engine take care of scaling it down into inches. The conversion takes place using the global **ScaleAndMirror** modifier in ModelDoc. We're NOT doing it at the import level on the mesh node, though that might have been a nicer choice for a couple reasons. (The global modifier isn't actually consistently global, it's kind of weird.)
So if you want to fit something onto the character as it exists in-game (compiled and all that), you should work against the source as it exists in centimeters, then in ModelDoc, you can perform the scaling down to inches either at the import level (on the mesh node), or using the global ScaleAndMirror modifier, **using a value of 0.3937.** (Only 4 decimals; this is an arbitrary choice.)
You should ideally NOT be doing any scaling on your 3D app's side.
## Animating with the SFM
There is, however, one downside to this: when you're animating the character in the SFM, you are effectively animating on something that is already scaled. Therefore, if you try to export animation out of the SFM to be used in the VMDL, things will look very wrong because the scaling will effectively be applied again on that.
The workaround is to create your own copy of the VMDL with the global scaling node disabled, and use that to animate.
# Procedural helper bones
These bones are set up to be procedural helpers driven entirely by constraints configured in ModelDoc. Feel free to open up citizen.vmdl and look at the constraint folders to see what makes them tick!
* arm_upper_*_twist (from shoulder to biceps)
* arm_elbow_helper_* (better deformation for extreme bend angles on the elbow)
* arm_lower_*_twist (from forearm to wrist)
* leg_upper_*_twist (from pelvis to thigh)
* leg_knee_helper_* (better deformation for extreme bend angles on the kneecap)
* leg_lower_*_twist (from calf to foot)
* neck_clothing (is the same as neck, but reducing twist by two-thirds, which clothing can use to deform nicer in some poses)
Animation data doesn't need to be exported from your 3D program for these (it's, in fact, set up to be ignored). Our own animation FBX files usually don't have them. It's just not needed!
If you're making a model (e.g. clothing) to be bonemerged on top of the citizen, you don't actually *need* to skin your mesh to these bones... but it's better if you do!
## Animation compositing with helpers
If you're using an animgraph to animate a character, it's best not to touch the helper bones at all, or to reset them to the bindPose state right before the end of the graph. Otherwise, you might see some jitter!
However, if you're using old-school Source1-style direct sequence playback, and if you're doing any compositing (in ModelDoc), your weightlists should include the helpers when relevant.
# IK bones
These bones are used to drive IK constraints in-engine. They need animated data.
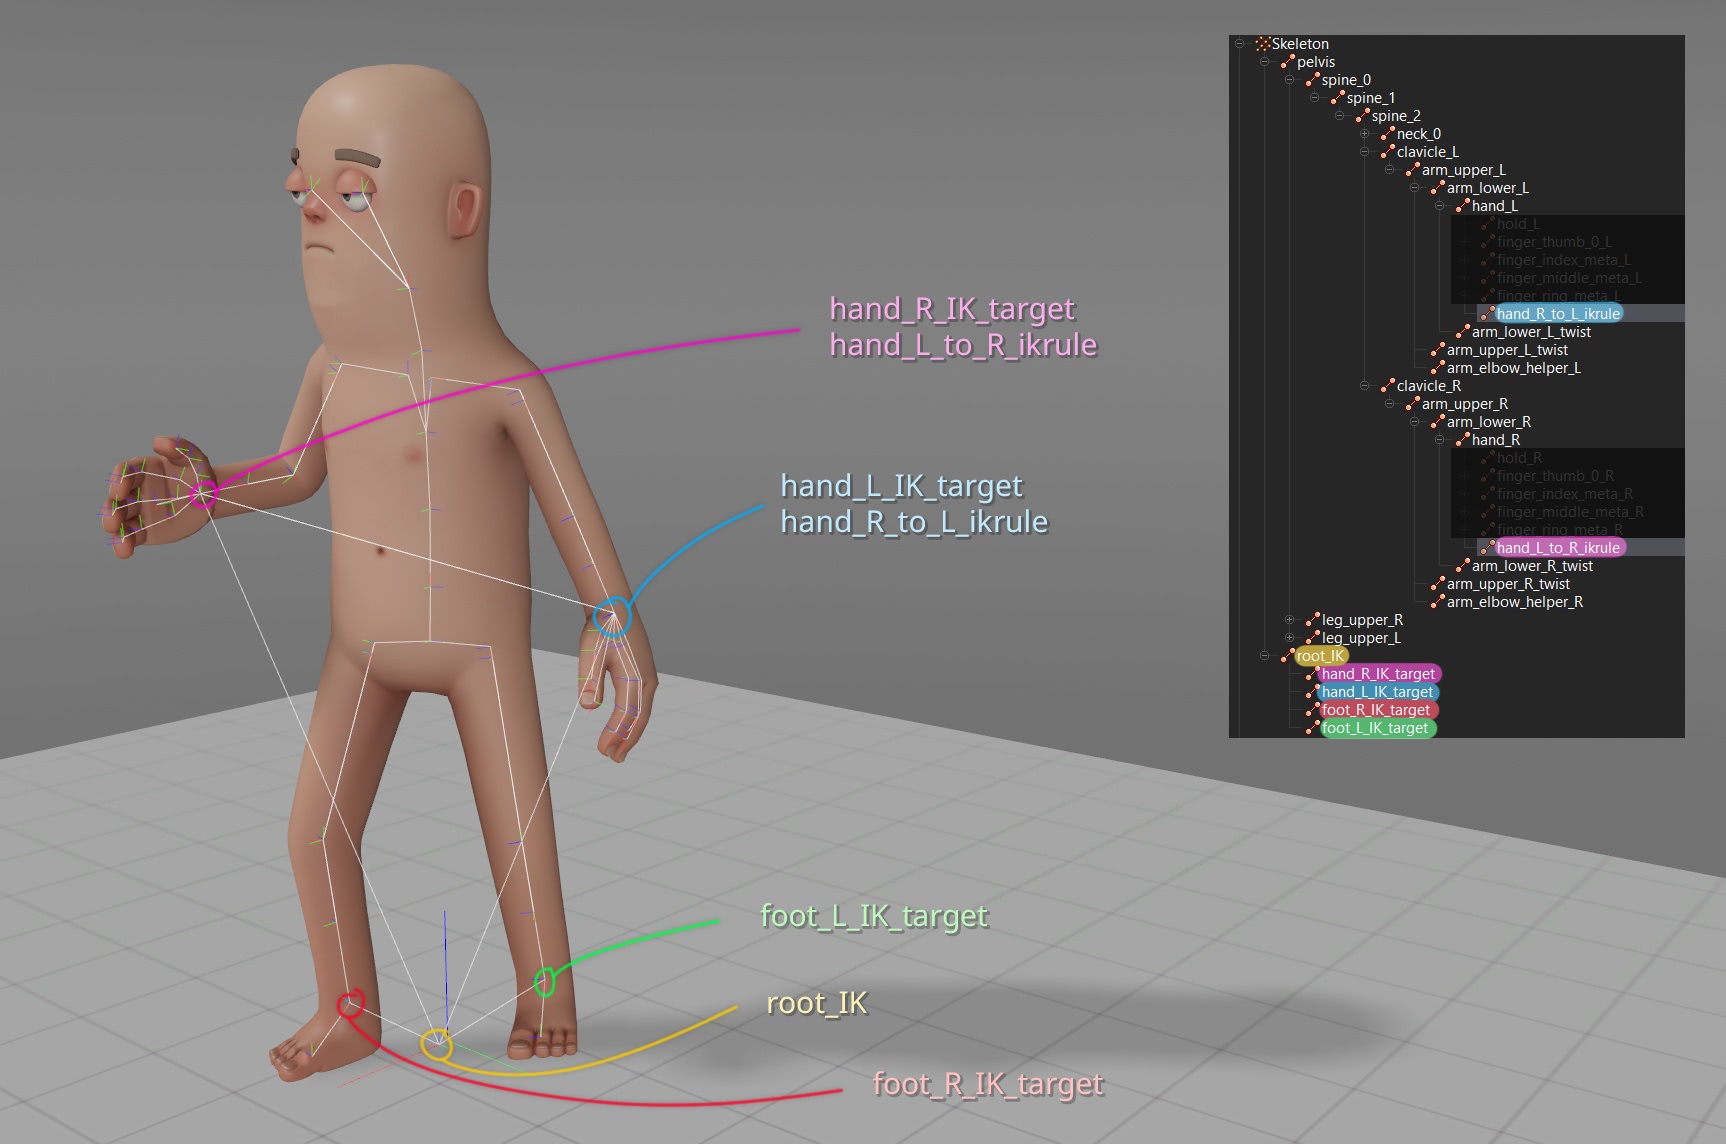
root_IK is the parent to all *_IK_target bones. These are effectively "model-space" IK targets.
Why are we doing it this way? Because the position of these targets needs to be kept in a different space that won't be affected by any layers, weightlists, etc. that animation compositing is touching, otherwise we can't restore the positions through IK afterwards! Think of them as a way to keep the pos/rot data of hands and feet intact, separately.
root_IK is, in the control rig, constrained to follow X and Y of the pelvis, but with Z (height) forced to 0. It also needs to always point forwards (zero rotation), otherwise funky things can happen. Similarly, the hand/feet target bones are pos/rot constrained to their respective hand/feet bones in the control rig.
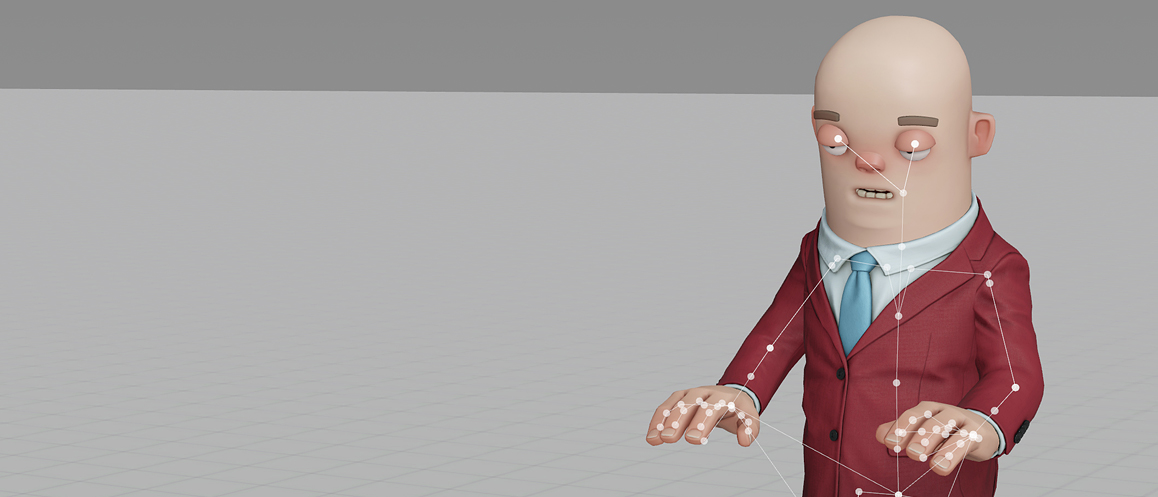
Additionally, there are two special IK bones, which are an attempt at reproducing the "ikrule touch" feature from Source 1.
* hand_L_to_R_ikrule (child of right hand, constrained to the left hand)
* hand_R_to_L_ikrule (child of left hand, constrained to the right hand)
These are used as a way to keep the position and orientation of hands the same *relative to each other*, even after applying layers, weightlists etc. and they are pos/rot constrained in the control rig.
In the animgraph, this is most often how the left hand is made to stick to a two-handed weapon that's driven by the right hand: in a way, it's not sticking to the gun itself, it's made to stick back to its original position relative to the right hand, even after all the aim matrices, breathing additive motion, etc. has been applied.
# LOD reference & guidelines
To give you an idea of how we use LODs on the Citizen... here are some figures.
* **LOD0:** 6.6k tris (+ 7.2k head)
* **LOD1:** 4.2k tris (+ 7.2k head) @ distance of 5, so it happens fairly close. **This level should be used to trim the low-hanging fruit as soon as possible.** We only use LOD1 to trim the poly density of the feet and fingers. The body mesh remains the exact same; this means far fewer headaches with not needing to sync with underlying topology. The head remains the same as LOD0(*).
To give you an idea of how we use LODs on the Citizen... here are the figures for the base meshes.
* **LOD0:** 6.6k tris (+ 7.2k head).
* **LOD1:** 4.2k tris (+ 7.2k head) @ distance of 5, so it happens fairly close and very fast. **This level is used to trim the low-hanging fruit as soon as possible, with almost zero impact to visuals.** We only use LOD1 to trim the poly density of the feet and fingers. The body and leg meshes remain the exact same; this means far fewer headaches with not needing to sync with underlying topology there. The head remains the same as LOD0(*).
* **LOD2:** 1.7k tris (+ 1.0k head) @ distance of 20. We are at a medium distance, slightly on the side of long. Helper bones are culled.
* **LOD3:** 1.0k tris (+ 0.4k head) @ distance of 40. Long distance. Even more bones are culled.
(*) For now. Whenever our tech & tools allow us to start maintaining a lower-density head with no headaches with regards to transferring morphs etc., we'll probably try to target a 4-5k tris head for LOD1.
⤶
Some clothing items might shift LOD1 back to a distance of 10 instead of 5, but unless they're displayed on their own, this does nothing; s&box implements a sort of "LOD sync", where bonemerged models follow the LOD level of their parent.*⤶
⤶
<note>Some clothing items might shift LOD1 back to a distance of 10 instead of 5, but this is only applicable when they are displayed on their own, away ⤶
from the player; s&box implements a sort of "LOD sync", which makes bonemerged models follow the LOD level of their parent.</note>⤶
A decent rule of thumb for telling when your model needs to switch down a LOD level is to look at when the wireframe starts looking like "solid green". Of course, it doesn't tell the whole story, but it's a good place to start from.
⤶
If you are using more than one material, and can cull the number of total materials back to one in your LOD meshes, you should do so!⤶
# Stretching limbs?
The Citizen has "support" for stretching and squashing the lengths of arms and legs while still looking reasonably good, thanks to the elbow & kneecap helpers. This is NOT actual "per-bone" scaling; the animations don't store scaling values. However, animations are, in a sense, fundamentally just a collection of lists of position & orientation coordinates for X bones at Y times. For example, the lower arm, being a child of the upper arm, sits in its parent space at a position of X = 10. There's nothing that prevents an animation from saying "in my animation, that X position offset is actually 12", meaning a 20% stretch.
The Citizen has "support" for stretching and squashing the lengths of arms and legs while still looking reasonably good, thanks to the elbow & kneecap helpers. This is NOT actual "per-bone" scaling; the animations don't store scaling values. However, animations are, in a sense, fundamentally just a collection of lists of position & orientation coordinates for X bones at Y times. For example, the lower arm, being a child of the upper arm, sits in its parent space at a position of X = 10. There's nothing that prevents an animation from saying "in my animation, that X position offset is actually 12", meaning a 20% stretch.
Likewise, there's nothing that prevents any bone from changing its position in their parent's local space. Human anatomy doesn't work that way, of course, but the Citizen is not a photorealistic character, and pushing bones around in various ways allows to get more interesting poses! Almost all of the "long idle" standing poses do this to various extents.
 Garry's Mod
 Rust
Rust
 Steamworks
 Wiki Help
 S&box
S&box