A beginners guide to Widgets
Editor UIs are built entirely out of widgets. Widgets are different from ASP.NET Razor, which is used for the in-game UI. Widgets are available in the Editor namespace, thus you should only make them from a tool or editor project.
Widgets can be various elements or components, such as buttons, text boxes, trees, or images.
Children widgets are the smaller widgets that are contained within a larger widget, known as the parent widget. Imagine a parent widget as a container, like a box, and the children widgets are like smaller objects placed inside that box.
If a widget does not have a parent, it is a root widget. This widget will act as a window on the user's operating system.
Creating and opening a window
There are four primary ways to do so:
- Using the Dock attribute on a class that inherits Widget at some level.
- Implementing the IAssetEditor interface and opening an asset with the extension specified on the class' EditorForAssetType attribute.
- Manually creating the widget with the Parent field set to
null, typically in a static method with the Menu attribute.
- Using the Tool attribute on a class that inherits Widget at some level.
Option 1 - Widget with Dock attribute
This will create widgets that behave like the Asset Browser, Projects list, Console feed, etc.
using Editor;
namespace MyToolProject;
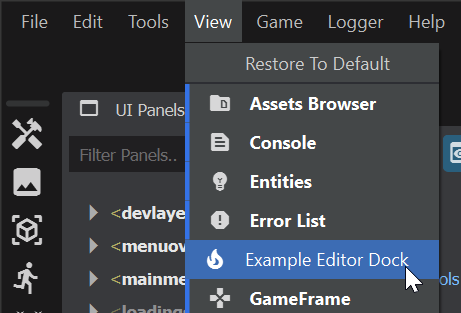
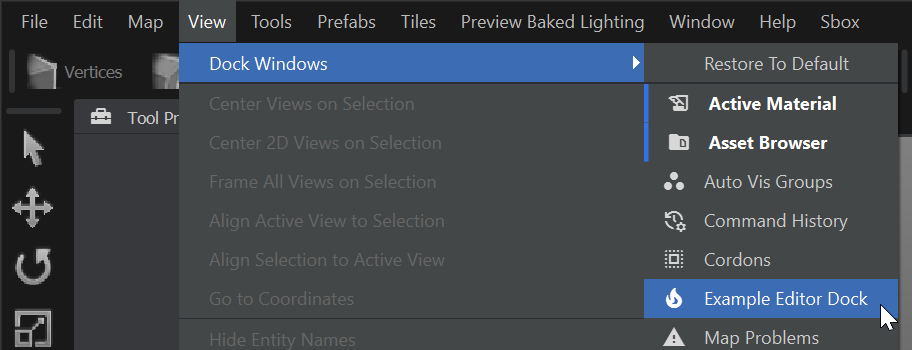
[Dock("Editor", "Example Editor Dock", "local_fire_department")]
public class DockAttrExample : Widget {
public DockAttrExample(Widget parent) : base(parent, false) {
}
}
The Dock attribute has three parameters
target
This is the DockWindow registered with the attribute that the widget should show up in.
Editor and Hammer are the only known options.name
What should be displayed when listing available docks.icon (optional)
Identifier of the icon to use.
The dock can then be opened from the associated window's list.
For Editor:
For Hammer:
Option 2 - Asset Editor
using Editor;
namespace MyToolProject;
[EditorForAssetType("8letters")]
public class AssetEditorExample : Widget, IAssetEditor {
public bool CanOpenMultipleAssets => true;
public AssetEditorExample(Widget parent, bool isDarkWindow = false) : base(parent, isDarkWindow) {
}
public void AssetOpen(Asset asset) {
Focus();
}
}
The EditorForAssetType attribute should have the extension of your custom asset type.
When the an asset is double clicked in the Asset Browser (or the edit button on the inspector) the widget will be created and AssetOpen will be called with the asset.
You may need to load
Option 3 - Manually
Not recommended for most use cases, but still an option.
using Editor;
namespace MyToolProject;
public class WidgetExample : Widget {
public WidgetExample(Widget parent, bool isDarkWindow = false) : base(parent, isDarkWindow) {
Show();
}
[Menu("Editor", "Example Code/Widget Example")]
public static void OpenExample() {
WidgetExample widget = new(null);
}
}
If the constructor doesn't call Show, then you will need to call it somewhere after constructing.
This only needs to be done for widgets that don't have a parent.
The static method with the Menu attribute creates an entry in the Editor's tool bar.
Option 4 - Widget with Tool attribute
Does not have to be a DockWindow, just has to inherit Widget. This is typically used for larger tools with many features and widgets.
using Editor;
namespace MyToolProject;
[Tool("Full Scale Tool", "local_fire_department", "Example of a large tool with lots of widgets")]
public class ToolAttrExample : DockWindow {
public ToolAttrExample() : base() {
}
}
Example Window
Let's create a widget that tests our user's Half-Life: 2 knowledge.
using Editor;
using System;
using System.Collections.Generic;
namespace MyToolProject;
public class HalfLife2Exam : Widget {
public HalfLife2Exam(Widget parent, bool isDarkWindow = false) : base(parent, isDarkWindow) {
DeleteOnClose = true;
MinimumSize = new(256, 256);
Size = new(384, 512);
Name = "HL2Exam";
WindowTitle = "Exam - Half-Life: 2";
SetWindowIcon("edit_note");
Layout = Layout.Column();
Show();
}
[Menu("Editor", "Exams/Half-Life: 2")]
public static void OpenExam() {
HalfLife2Exam _ = new(null);
}
}
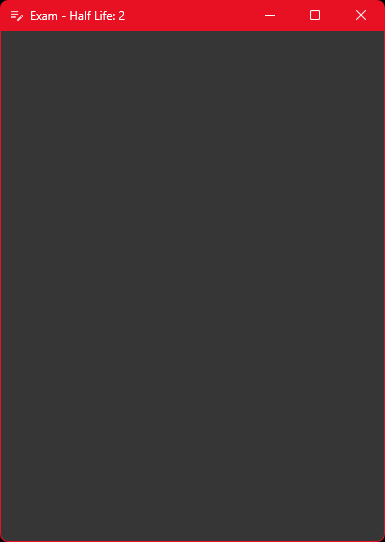
Using the Editor's tool bar we can open the window
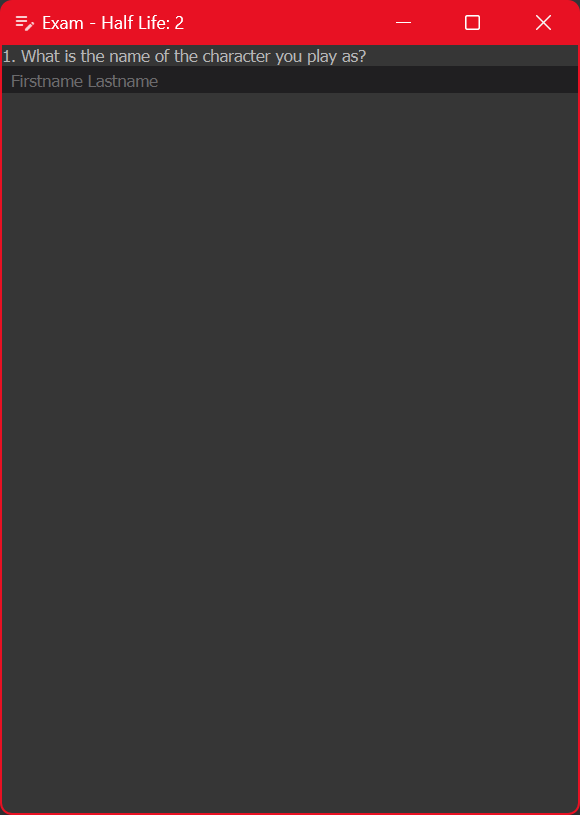
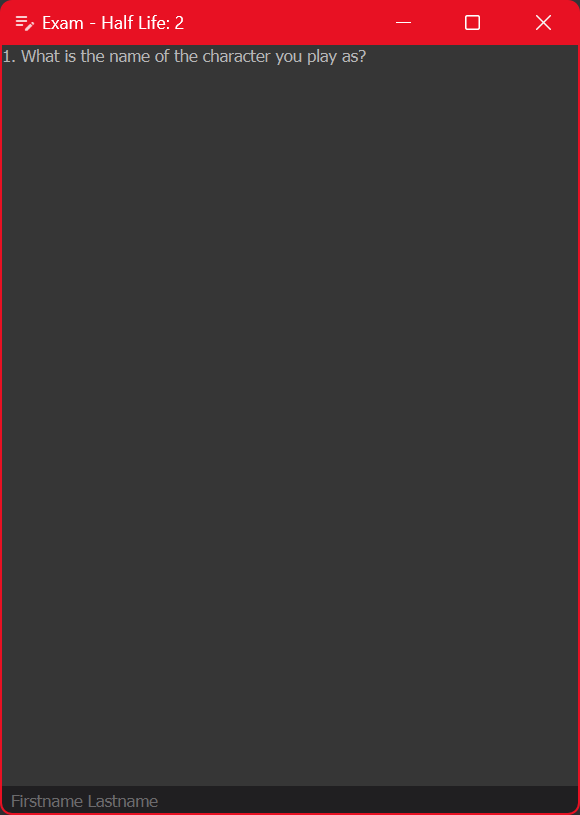
Let's start adding a few widgets to ask questions and take answers. First question we will ask, is for the name of the character you play as.
Layout.Add(new Label("1. What is the name of the character you play as?", this));
GordonsName = Layout.Add(new LineEdit(this) { PlaceholderText = "Firstname Lastname" });
If we re-open our exam, we can now see the label and text input.
It's nice to see things working, but the spacing is ugly. We can fix this by adding a stretch cell to occupy the extra space in one spot.
Layout.AddStretchCell();
This will bunch the label and text input together
Changing when the stretch cell is added to the layout, you can spread the widgets out differently.
This is what happens when you add the stretch cell after the label, but before the text input
For now, let's make the stretch cell as the last member of the layout.
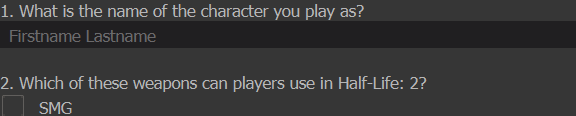
Next, let's ask what weapons the player can use in Half-Life 2 using a list of check boxes
public class HalfLife2Exam : Widget {
private LineEdit GordonsName;
private List<CheckBox> CorrectCheckBoxes = new();
private List<CheckBox> WrongCheckBoxes = new();
public HalfLife2Exam(Widget parent, bool isDarkWindow = false) : base(parent, isDarkWindow) {
Layout.Add(new Label("2. Which of these weapons can players use in Half-Life: 2?", this));
CorrectCheckBoxes.Add(Layout.Add(new CheckBox("SMG", this)));
CorrectCheckBoxes.Add(Layout.Add(new CheckBox("Crowbar", this)));
WrongCheckBoxes.Add(Layout.Add(new CheckBox("AK-47", this)));
WrongCheckBoxes.Add(Layout.Add(new CheckBox("M4A1", this)));
CorrectCheckBoxes.Add(Layout.Add(new CheckBox("AR2", this)));
Layout.AddStretchCell();
Show();
}
}
Notice we store the check boxes into a list. We will need to access to the check boxes later when grading the test.
The check boxes work, but there should be spacing between question 1 and 2. We can solve this using the layout
Layout.AddSpacingCell(16);
Add this between the text input and the question 2 label, and a 16 pixel (scaled by operating system) gap will now appear between the two questions
This test is already quite big with 2 whole questions, so let's wrap it up by adding a submit button
Layout.AddSpacingCell(16);
Layout.Add(new Button("Submit", this) { Clicked = ExamSubmitted });
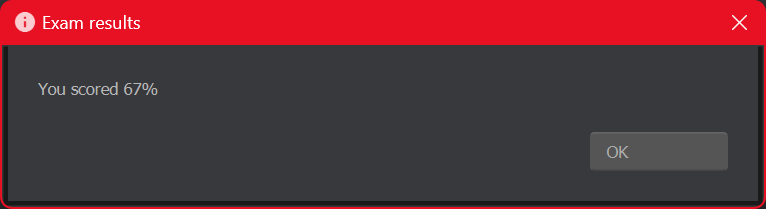
and a method to grade the exam when it's clicked
public void ExamSubmitted() {
float score = 75f;
PopupWindow popup = new("Exam results", $"You scored {score}%");
popup.Show();
}
The final code should look something like
using Editor;
using System;
using System.Collections.Generic;
namespace MyToolProject;
public class HalfLife2Exam : Widget {
private LineEdit GordonsName;
private List<CheckBox> CorrectCheckBoxes = new();
private List<CheckBox> WrongCheckBoxes = new();
public HalfLife2Exam(Widget parent, bool isDarkWindow = false) : base(parent, isDarkWindow) {
DeleteOnClose = true;
MinimumSize = new(256, 256);
Size = new(384, 512);
Name = "HL2Exam";
WindowTitle = "Exam - Half-Life: 2";
SetWindowIcon("edit_note");
Layout = Layout.Column();
Layout.Add(new Label("1. What is the name of the character you play as?", this));
GordonsName = Layout.Add(new LineEdit(this) { PlaceholderText = "Firstname Lastname" });
Layout.AddSpacingCell(16);
Layout.Add(new Label("2. Which of these weapons can players use in Half-Life: 2?", this));
CorrectCheckBoxes.Add(Layout.Add(new CheckBox("SMG", this)));
CorrectCheckBoxes.Add(Layout.Add(new CheckBox("Crowbar", this)));
WrongCheckBoxes.Add(Layout.Add(new CheckBox("AK-47", this)));
WrongCheckBoxes.Add(Layout.Add(new CheckBox("M4A1", this)));
CorrectCheckBoxes.Add(Layout.Add(new CheckBox("AR2", this)));
Layout.AddSpacingCell(16);
Layout.Add(new Button("Submit", this) { Clicked = ExamSubmitted });
Layout.AddStretchCell();
Show();
}
public void ExamSubmitted() {
int points = 0;
int maximumPoints = 1;
if (GordonsName.Value.ToLower().Trim() == "gordon freeman")
points++;
foreach (CheckBox checkbox in CorrectCheckBoxes) {
maximumPoints++;
if (checkbox.Value)
points++;
}
foreach (CheckBox checkbox in WrongCheckBoxes) {
maximumPoints++;
if (!checkbox.Value)
points++;
}
float score = MathF.Round(points / (float) maximumPoints * 100f);
PopupWindow popup = new("Exam results", $"You scored {score}%");
popup.Show();
}
[Menu("Editor", "Exams/Half-Life: 2")]
public static void OpenExam() {
HalfLife2Exam _ = new(null);
}
}
Fill out the exam
and click submit
Dock Windows
Read Widget Docking for guidance


 Garry's Mod
 Rust
Rust
 Steamworks
 Wiki Help
 S&box
S&box