Quixel Bridge Plugin
There's a plugin for s&box that allows you to use Quixel assets super easily with one click using a program known as "Quixel Bridge". This guide will help you set up and use this plugin, in the hopes that it'll supercharge your workflow and allow you to quickly make high-quality content.
This plugin is not written or supported by Facepunch.
Please be aware that the 'free' Quixel tier is for use with Unreal Engine only.
This tool should only be used with either the 'Personal', 'Indie', or 'Studio' Quixel tiers.
More information about these is located here.
Setup
You'll only need to do this stuff once.
s&box setup
- Download the plugin from GitHub.
- Extract it somewhere permanent, e.g. next to all your other s&box addons.
- Add it through the s&box addon manager window ("Add" -> "From folder..").
- Click "Quixel" -> "Settings" in the s&box editor and select the addon you want to export to.
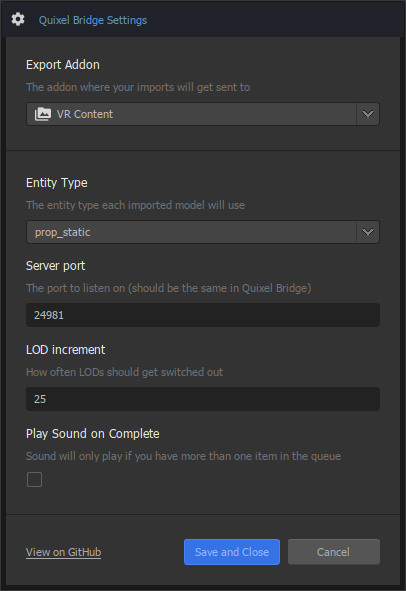
- Click "Save and Close" to apply the settings you've chosen.
Bridge Setup
- Download Quixel Bridge from the Quixel website.
- Open Quixel Bridge.
- Open "Edit" -> "Export Settings":
- Change "Export Target" to "Custom Socket Export"
- Open the "Textures" tab and select "PNG" as the texture format

Usage
After you've set everything up, using it is straightforward.
- Make sure the plugin is enabled in s&box - go into the "Quixel" menu in the editor, and hit "Start Bridge Plugin".
- Go to Quixel Bridge.
- Select an asset, click the green "Download" button.
- Once downloaded, the click the blue "Export" button.
You can find your exported assets exported in the "megascans" directory in the root folder for the addon you picked.
You can select multiple assets at once by holding down the ctrl key, which allows you to download and export in bulk.
 Garry's Mod
 Rust
Rust
 Steamworks
 Wiki Help
 S&box
S&box