Workshop Addon Creation
Creating a Workshop Addon
This article will teach you how to prepare and upload an addon to the Steam Workshop.
Before you begin - Rules
There are a few rules before you start uploading addons.
Please see this page for complete set of rules: Steam Workshop Rules
The easy way
You can use alternative tools such as GUIs (graphical user interfaces) made by community members to create, extract and upload addons to Steam Workshop.
Links to such known tools: (feel free to expand)
- gmpublisher (GUI for Windows, macOS and Linux)
- Garry's Mod Addon Tool (Windows)
- Garry's Mod Publishing Utility - Java based GUI wrapper
- gmosh - Command line interface wrapper
- Garry's Mod Easy Addon Uploader (for Windows only)
- LuaWorkshopper - Quick tool for Addon making and publishing
- Garry's Mod Workshop Utility (Easy create, upload..etc)
- Crowbar (Unpack, Publish, and Pack) -- Publish to Workshop via Crowbar (Guide)
- Command line drag-drop batch interface creator/updater/publisher (Windows)
Alternatively, the guide below describes how to upload addons to the Steam Workshop using Garry's Mod's shipped tools, gmad.exe and gmpublish.exe.
Preparing your addon
To upload an addon to workshop you will need the following things:
- A folder anywhere on your computer containing addon files
- A 512x512 .jpg icon for your addon.
If you're going to make your addon public, please make sure it's unique and will add something new to Garry's Mod. Don't upload addons you didn't make, even fixed versions, without the author's consent.
Folder with addon files
The structure of addon for Steam Workshop is the same as the classic/legacy addon system in the addons/ folder, except for those differences:
- You can only upload files that would normally be mounted by the game, except for:
.dll,.exe,.htm,.html,.cssand.jsfiles are restricted.txtfiles are restricted too, except for vehicle scripts- Full file path whitelist can be found here:
- For addons made before 2013,
info.txtoraddon.txtare not needed at all, not even inaddons/folder
Your addon folder structure must look somewhat like this: (below is just an example)
Here's all the folder names that your addon may contain, next to the addon.json file:
my_addon is the folder you will need to input to gmad.exe or any other Workshop uploader and its name could be anything, addon's name is defined on the Workshop Page for that addon and NOT by the folder name.Example
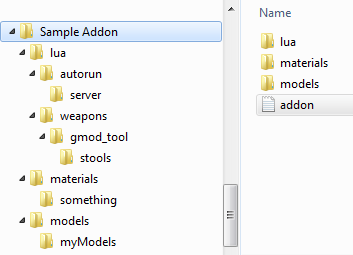
Sample Addon is the folder you will need to provide to the gmad.exe to convert it to .gma.
Before uploading - test your addon
It is generally a good idea to do a final test of your addon before uploading it to workshop to make sure everything works properly.
Doing so is easy, simply put your addon folder (in this example it would be called my_addon) into the game's steamapps/GarrysMod/garrysmod/addons/ folder and load up the game.
The icon
This must be a 512x512 Baseline JPEG image ( Progressive JPEG or a PNG image will NOT work! ). If gmpublish.exe does not accept your icon, try reexporting it with Paint or Paint.NET, that should convert it to Baseline. The chroma must be 4:2:0, for instance Photoshop and GIMP can use 4:2:2 or 4:4:4, which are not accepted.
Do not use an image unrelated to your addon - this is stupid and will get your addon removed. Express your addon in image form.
Make it relevant to your addon. Please don't just stitch together something horrible in MS Paint. It should look good, otherwise you'll be making the workshop look dirty. Besides, who wants to download something that looks like a three-year-old made it?
addon.json
When creating an addon the folder should have an addon.json - which looks like this..
title is the name of your addon.
type is the type of addon, one of:
tags is up to two of these:
Ignore is a simple wildcard list of files to ignore. You can have as many of these as you want - and they don't have to be wildcarded, they can be specific files.
Creating a .gma for upload
For Windows and Linux, you can simply navigate to your GMad in <STEAM LOCATION>/steamapps/common/garrysmod/bin and drag'n'drop your addon folder ( my_addon in this example'' ) onto it. If using Linux, the binaries will be located under linux32 or linux64 depending on your system architecture. If in doubt, go into linux64.
GMad will now create your .gma. It will place it to the same location where your folder is, with the same name.
Do not move GMad anywhere!
Alternatively You can open the command prompt (cmd.exe), cd to the gmod bin folder
(<tt>cd "<STEAM FOLDER>/steamapps/common/garrysmod/bin"</tt>, include quotes), then enter the following command (including quotes):
Windows users can also create a .bat file to automate this process:
Just make sure to insert correct path to your GMad.exe.
Common Errors
[Files does not pass whitelist]
You have either dragged a wrong folder onto GMad.exe, your addon contains forbidden files or your addon has incorrect folder structure. See example above for correct addon folder structure and file whitelist.
Couldn't parse json
Your JSON file is missing or it is invalid. Use any JSON validators to find and fix errors.
Uploading your addon
There are multiple ways of doing that, we are going to cover only the most convenient way of doing this, if you are on Windows.
At this point you should have a .gma file and a .jpg file. For the sake of making this easy, rename both files to have the same name, for example my_addon:
- my_addon.jpg
- my_addon.gma
Next you want to create a .bat file somewhere and put these commands in the .bat file:
Save it as something like gmpublish_create.bat.
Once you got the .bat file ready, simply drag'n'drop your .gma or your .jpg onto that .bat file. It is essential that both files must have the same name.
Now gmpublish.exe will go through the process of compressing and uploading the addon to Steam Workshop.
Once that process is completed, open your Garry's Mod Steam Workshop, go to "My Shared Files" ( You can also get there from your profile ) and change visibility of your addon to Public.
You are done. Your addon is now live. You can now change the title, description, images and videos for your addon.
Note that rules also apply to your title, description, images, icon and videos:
- No questionable content
- No racism or offensive language/material
Common Errors
Compression Failed
This is simple - your addon is too big. This is usually solved by downscaling your .vtf textures. Note that some video cards may not even support 4096x4096 textures! 1024x1024 or 512x512 are usually more than enough.
Make sure that if you are uploading a particularly texture-heavy addon that you use DXT5 texture compression. DXT5 is exponentially smaller than RGBA or BGRA, saving not only time downloading and uploading but cloud space.
Ran out of quota
If this happened to you, contact robotboy655@facepunchstudios.com for help.
Addon has invalid type!
Your addon.json has the "type" tag set to an invalid value. You can see a list of allowed values above.
PublishWorkshopFile failed! (8)
This error happens when the addon.json contains invalid UTF-8 sequences. This happens if you use an upload script (.cmd, .bat, etc) that cannot create the addon.json with the UTF-8 character set. Please fix your addon.json by editing it as UTF-8 or use a title using only US-ASCII characters (latin characters with no accents).
This error only happens after the upload because the addon.json is packed inside of the sent GMA file.
PublishWorkshopFile failed! (9)
An icon must be provided.
PublishWorkshopFile failed! (X)
If you encountered an error with a number that is not listed on this page, you can find a list of all Steam related error codes on this handy website: https://steamerrors.com/
Please note - that website is not associated with Steam, Valve or Facepunch in any way, and may be incomplete.
libsteam_api.so: cannot open shared object file: No such file or directory
This is an error that may happen on Linux when gmpublish fails to find its Steam API dependency. You can resolve this by copying the libsteam_api.so dependency from the game's bin/ folder to /usr/lib/, or by setting the LD_LIBRARY_PATH environment variable appropriately. See #4542 for more info.
After Going Live
Please make sure your addon isn't creating errors for people. If your addon is creating too many errors it will be removed.
You can learn how to update existing workshop addons in this article: Workshop Addon Updating
 Garry's Mod
 Rust
Rust
 Steamworks
 Wiki Help